[Android] 레이아웃 - 2 : 제약 레이아웃, 레이아웃 편집기
이전 내용
[Android] 레이아웃 - 1
이전 내용 [Android] 위젯 - 이미지뷰(Image View)이전 내용 [Android] 계산기 만들기이전 내용 [Android] 회원정보 출력 기능 만들기이전 내용 [Android] 난수 생성기 만들기이전 내용 [Android] 안드로이드 위젯
puppy-foot-it.tistory.com
제약 레이아웃
제약 레이아웃은 뷰의 크기와 위치를 결정할 때 제약 조건(Constraint)을 사용한다. 제약 조건이란 뷰가 레이아웃 안의 다른 요소와 어떻게 연결되는지 알려주는 것으로, 다른 요소들과 연결선을 통하여 만들 수 있다.
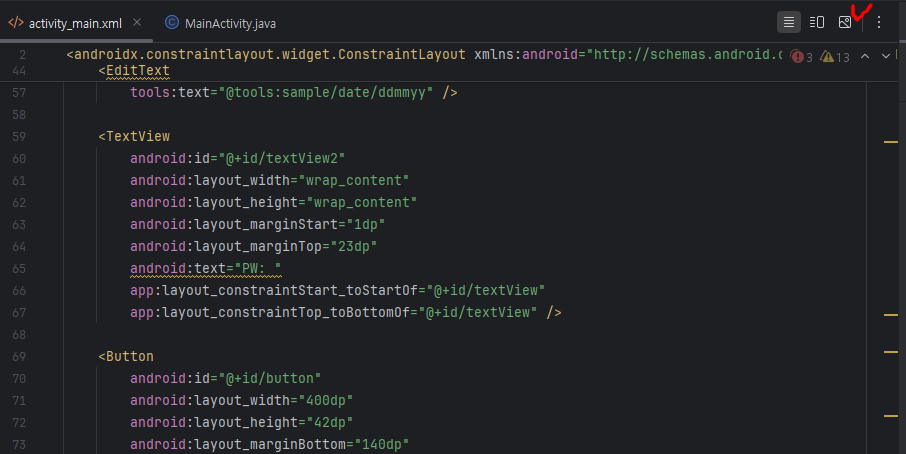
아래와 같은 로그인 레이아웃이 있다. (activity_main.xml)
<?xml version="1.0" encoding="utf-8"?>
<androidx.constraintlayout.widget.ConstraintLayout xmlns:android="http://schemas.android.com/apk/res/android"
    xmlns:app="http://schemas.android.com/apk/res-auto"
    xmlns:tools="http://schemas.android.com/tools"
    android:layout_width="match_parent"
    android:layout_height="match_parent"
    tools:context=".MainActivity">

    <ImageView
        android:id="@+id/imageView"
        android:layout_width="390dp"
        android:layout_height="186dp"
        android:layout_marginStart="8dp"
        android:layout_marginTop="75dp"
        android:layout_marginBottom="77dp"
        app:layout_constraintBottom_toBottomOf="@+id/editTextText"
        app:layout_constraintStart_toStartOf="parent"
        app:layout_constraintTop_toTopOf="parent"
        app:layout_constraintVertical_bias="0.75"
        tools:srcCompat="@tools:sample/avatars" />

    <TextView
        android:id="@+id/textView"
        android:layout_width="wrap_content"
        android:layout_height="wrap_content"
        android:layout_marginStart="57dp"
        android:layout_marginBottom="6dp"
        android:text="ID: "
        app:layout_constraintBottom_toBottomOf="@+id/editTextText"
        app:layout_constraintStart_toStartOf="parent" />

    <EditText
        android:id="@+id/editTextText"
        android:layout_width="209dp"
        android:layout_height="48dp"
        android:layout_marginEnd="2dp"
        android:layout_marginBottom="12dp"
        android:ems="10"
        android:hint="아이디"
        android:inputType="text"
        app:layout_constraintBottom_toTopOf="@+id/editTextDate"
        app:layout_constraintEnd_toEndOf="@+id/editTextDate" />

    <EditText
        android:id="@+id/editTextDate"
        android:layout_width="wrap_content"
        android:layout_height="wrap_content"
        android:layout_marginStart="52dp"
        android:layout_marginEnd="50dp"
        android:ems="10"
        android:hint="비밀번호"
        android:inputType="text"
        app:layout_constraintBottom_toBottomOf="parent"
        app:layout_constraintEnd_toEndOf="parent"
        app:layout_constraintStart_toEndOf="@+id/textView"
        app:layout_constraintTop_toTopOf="parent"
        tools:text="@tools:sample/date/ddmmyy" />

    <TextView
        android:id="@+id/textView2"
        android:layout_width="wrap_content"
        android:layout_height="wrap_content"
        android:layout_marginStart="1dp"
        android:layout_marginTop="23dp"
        android:text="PW: "
        app:layout_constraintStart_toStartOf="@+id/textView"
        app:layout_constraintTop_toBottomOf="@+id/textView" />

    <Button
        android:id="@+id/button"
        android:layout_width="400dp"
        android:layout_height="42dp"
        android:layout_marginBottom="140dp"
        android:text="LOGIN"
        app:layout_constraintBottom_toBottomOf="parent"
        app:layout_constraintEnd_toEndOf="parent"
        app:layout_constraintHorizontal_bias="0.5"
        app:layout_constraintStart_toStartOf="parent" />

    <TextView
        android:id="@+id/textView3"
        android:layout_width="0dp"
        android:layout_height="wrap_content"
        android:text="아이디/비밀번호찾기"
        tools:layout_editor_absoluteX="135dp"
        tools:layout_editor_absoluteY="603dp" />

</androidx.constraintlayout.widget.ConstraintLayout>
[코드 설명]
ImageView (@+id/imageView):
- android:layout_width="390dp": 너비를 390dp로 설정.
- android:layout_height="186dp": 높이를 186dp로 설정.
- android:layout_marginStart="8dp", android:layout_marginTop="75dp", android:layout_marginBottom="77dp": 각각 시작, 상단, 하단의 여백을 설정.
- 제약 조건: 부모의 상단 및 하단에 고정되어 있으며, @+id/editTextText와 연결되어 있다.
- 사용자 프로필 이미지나 로고 등의 시각적 요소를 표시힌다.
TextView (@+id/textView):
- android:layout_width="wrap_content": 내용에 맞춰 너비 조정.
- android:layout_height="wrap_content": 내용에 맞춰 높이 조정.
- android:text="ID: ": 텍스트를 "ID: "로 설정.
- 제약 조건: @+id/editTextText와 연결되어 있으며, 부모의 시작 부분에 고정.
- 사용자에게 입력해야 할 "아이디" 필드를 안내하기 위한 레이블 역할.
EditText (@+id/editTextText):
- android:layout_width="209dp": 너비를 209dp로 설정.
- android:layout_height="48dp": 높이를 48dp로 설정.
- android:hint="아이디": 입력 필드에 대한 힌트를 "아이디"로 설정.
- android:inputType="text": 일반 텍스트 입력 허용.
- 제약 조건: @+id/editTextDate와 연관되어 있으며, 부모 상단에 위치.
- 사용자가 아이디를 입력하는 필드.
EditText (@+id/editTextDate):
- android:layout_width="wrap_content": 내용에 맞춰 너비 조정.
- android:layout_height="wrap_content": 내용에 맞춰 높이 조정.
- android:hint="비밀번호": 입력 필드에 대한 힌트를 "비밀번호"로 설정.
- android:inputType="text": 일반 텍스트 입력 허용.
- 제약 조건: @+id/textView와 함께 위치시키며, 부모의 하단에서 고정.
- 사용자가 비밀번호를 입력하는 필드.
TextView (@+id/textView2):
- android:layout_width="wrap_content": 내용에 맞춰 너비 조정.
- android:layout_height="wrap_content": 내용에 맞춰 높이 조정.
- android:text="PW: ": 텍스트를 "PW: "로 설정.
- 제약 조건: @+id/textView 아래에 위치.
- 비밀번호 입력 필드에 대한 레이블 역할.
Button (@+id/button):
- android:layout_width="400dp": 너비를 400dp로 설정.
- android:layout_height="42dp": 높이를 42dp로 설정.
- android:text="LOGIN": 버튼의 텍스트를 "LOGIN"으로 설정.
- 제약 조건: 부모의 하단과 연결되어 있다.
- 사용자가 로그인 요청을 할 수 있는 버튼.
TextView (@+id/textView3):
- android:layout_width="0dp": 너비가 0dp로 설정되어 있지만, 내용에 따라 조정될 수 있다.
- android:layout_height="wrap_content": 내용에 맞춰 높이 조정.
- android:text="아이디/비밀번호찾기": 사용자가 아이디 또는 비밀번호를 찾도록 안내하는 텍스트 설정.
- 사용자에게 아이디/비밀번호 찾기 링크 또는 기능을 안내하는 역할.
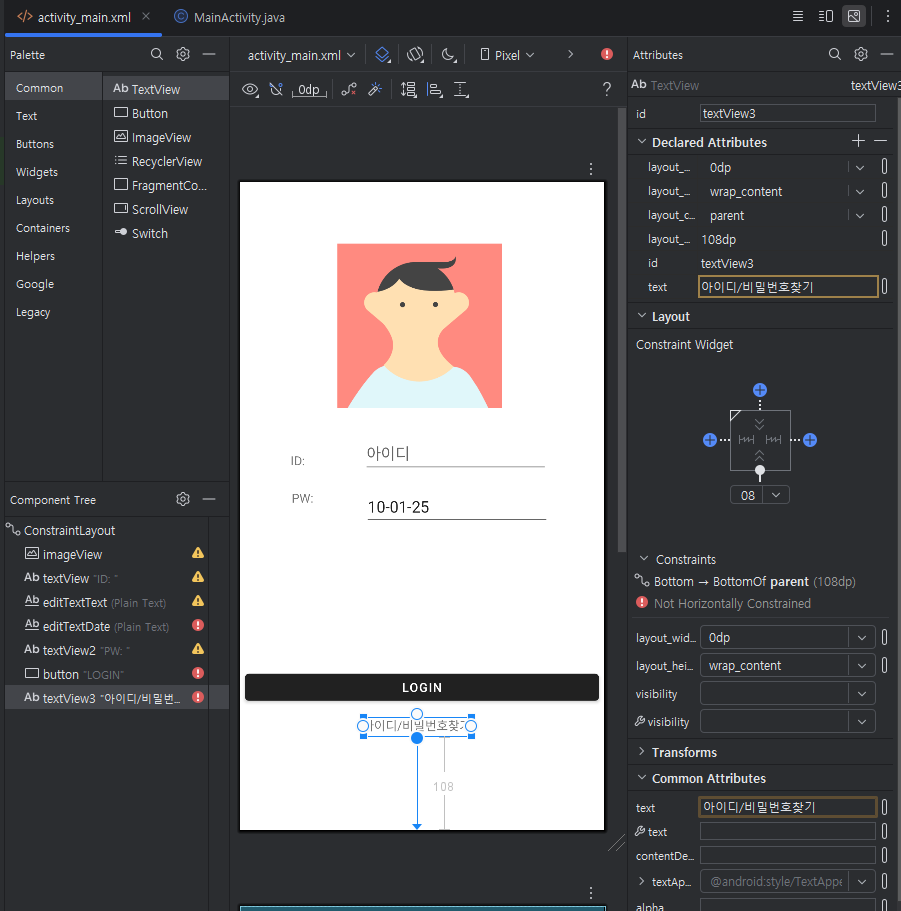
여기서 우측 상단의 네모 버튼(Design)을 누르게 되면 레이아웃 편집기를 사용할 수 있다.
안드로이드 스튜디오의 레이아웃 편집기(Layout Editor)는 UI를 시각적으로 설계하고 구성할 수 있는 도구다. 이 도구는 XML 레이아웃 파일을 직접 편집할 수 있도록 해주며, 드래그 앤 드롭으로 구성 요소를 추가하고 스타일을 설정하는 기능을 제공 한다.
레이아웃 편집기의 각 기능에 대해서는 안드로이드 스튜디오 사이트에 잘 나와있으므로, 참고 하는 것을 권장한다.
https://developer.android.com/studio/write/layout-editor?hl=ko
뷰로 UI 개발 | Android Studio | Android Developers
Layout Editor에서는 레이아웃 XML을 직접 작성하는 대신 UI 요소를 시각적 디자인 편집기로 드래그하여 레이아웃을 신속하게 빌드할 수 있습니다.
developer.android.com
[레이아웃 편집기 주요 기능]
1. 드래그 앤 드롭 인터페이스
안드로이드 레이아웃 편집기는 사용자가 UI 요소를 드래그하고 놓는 방식으로 인터페이스를 손쉽게 구성할 수 있는 기능을 제공한다. 이러한 드래그 앤 드롭 방식은 비주얼 디자인을 지원하여 요소를 실시간으로 배치하고 확인할 수 있게 도와준다.
2. XML 뷰와 디자인 뷰 동시 표시
편집기에서는 XML 코드와 디자인 뷰를 동시에 확인할 수 있다. 사용자는 XML 코드를 수정하면서 동시에 디자인 화면에서 변경 사항을 실시간으로 확인할 수 있어, 직관적인 디자인 작업이 가능하다.
3. 제약 조건 기반 레이아웃
ConstraintLayout을 사용하면 UI 요소 간의 제약 조건을 설정하여 복잡한 레이아웃을 쉽게 구축할 수 있다. 요소 간의 관계를 시각적으로 설정할 수 있어, 다양한 화면 크기에서의 레이아웃 적응성을 높이고, 사용자 경험을 향상시키는 데 기여한다.
4. 다양한 레이아웃 미리 보기
편집기는 여러 화면 크기와 방향(세로 또는 가로)에 따라 UI가 어떻게 보일지를 미리 볼 수 있는 기능을 제공한다. 이를 통해 다양한 디바이스에서의 호환성을 체크하고, 각 화면에 맞는 최적의 레이아웃을 설계할 수 있다.
5. 스타일 및 테마 적용
사용자는 UI 요소에 대해 색상, 텍스트 스타일, 배경 등 다양한 스타일을 손쉽게 적용할 수 있다. 테마 기능을 통해 앱 전체의 일관성을 유지하며, 사용자에게 보다 매력적이고 통일된 경험을 제공할 수 있다.
6. 속성 팔레트
편집기는 각 UI 요소의 속성을 수정할 수 있는 속성 팔레트를 제공한다. 이를 통해 사용자는 간단하게 속성 값을 조정하여 UI를 신속하게 업데이트할 수 있다.
7. 내장된 가이드라인
디자인을 더욱 직관적으로 구성할 수 있도록 도와주는 가이드라인 기능이 있다. 이 기능은 요소 간의 정렬을 쉽게 할 수 있게 해 주어, 시각적으로 균형 잡힌 레이아웃을 만드는 데 유용하다.
8. 유틸리티 툴
안드로이드 레이아웃 편집기에는 패딩, 마진, 투명도, 크기 등을 쉽게 조절할 수 있는 유틸리티 툴이 통합되어 있다. 이를 통해 사용자는 원하는 디자인을 세밀하게 조정할 수 있다.
[참고]
다음 내용
[Android] 텍스트뷰 동적 생성
이전 내용 [Android] 레이아웃 - 2 : 제약 레이아웃, 레이아웃 편집기이전 내용 [Android] 레이아웃 - 1이전 내용 [Android] 위젯 - 이미지뷰(Image View)이전 내용 [Android] 계산기 만들기이전 내용 [Android] 회원
puppy-foot-it.tistory.com