이전 내용
[java] 예제 및 풀이 (Switch, 배열 + 반복문)
이전 내용 [java] java 예제 및 풀이(scanner, 조건문, do-while)이전 내용 [java] parse+자료형: 문자열 변환이전 내용 [java] 이클립스 한글 깨짐이전 내용 [java] 이클립스 다크모드, 글꼴 설정이전 내용 [J
puppy-foot-it.tistory.com
클래스와 구성 요소
1. 클래스 (Class)
클래스는 객체 지향 프로그래밍의 기본 단위로, 객체를 생성하기 위한 청사진 또는 템플릿이다. 클래스는 객체의 속성과 행동을 정의한다. 예를 들어, '자동차'라는 클래스를 정의하면 자동차의 속성(종류, 색상 등)과 행동(운전하다, 멈추다 등)을 포함할 수 있다.
2. 필드 (Field)
필드는 클래스 내부에 정의된 변수로, 객체의 상태나 속성을 나타낸다. 필드는 클래스의 모든 인스턴스가 공유할 수 있는 데이터이며, 접근 수정자(public, private 등)를 통해 접근 제어를 할 수 있다. 예를 들어, 자동차 클래스에는 '색상', '모델명' 등의 필드가 있을 수 있다.
3. 생성자 (Constructor)
생성자는 클래스의 객체를 생성할 때 호출되는 특별한 메소드다. 생성자는 객체의 초기 상태를 설정하며, 클래스 이름과 동일한 이름을 가진다. 생성자는 기본 생성자(인자가 없는 경우)와 매개변수가 있는 생성자로 나눌 수 있다. 예를 들어, 자동차 클래스에서 색상과 모델명을 매개변수로 받는 생성자를 정의할 수 있다.
- 기본 생성자: 클래스 선언 시 컴파일러에 의해 자동으로 추가되는 생성자. (다른 생성자가 있으면 자동으로 생성되지 않음.)
- 생성자 선언: 생성자를 명시적으로 선언 가능. 생성자를 선언하면 기본 생성자는 생성되지 않음.
- 매개 변수: 생성자 호출 시 값을 전달받기 위해 선언되는 변수
- 객체 초기화: 생성자 내부에서 필드값 초기화하거나 메소드 호출해서 사용 준비를 하는 것
- 오버로딩: 매개 변수 달리하는 생성자를 여러 개 선언
4. 메소드 (Method)
메소드는 클래스 내부에 정의된 함수로, 객체의 행동을 나타낸다. 메소드는 객체가 수행할 수 있는 작업을 정의하며, 매개변수를 받을 수도 있다. 예를 들어, 자동차 클래스에는 '주행하다', '멈추다' 등의 동작을 구현한 메소드가 있을 수 있다.
this() 코드
car 라는 클래스 안에 제조사, 모델, 색상, 최고속도를 입력받는 필드가 있고, 그 안에 네가지의 생성자가 있다.
그리고 이를 출력하는 메서드가 있다.
아래는 각 생성자별로 값이 다르게 나오기 하기 위한 코드다.
public class Car {
	// 제조사, 모델, 색상, 최고속도
	String company;
	String model;
	String color;
	int maxSpeed;

	// Default 생성자
	Car() {
		this.company = "현대자동차";
		this.model = "아반떼";
		this.color = "blue";
		this.maxSpeed = 200;
	}

	// 생성자1. 모델만 가져옴
	Car(String model) {
		this.company = "기아자동차";
		this.model = model;
		this.color = "white";
		this.maxSpeed = 200;
	}

	// 생성자2. 모델과 색상 가져옴
	Car(String model, String color) {
		this.company = "BMW";
		this.model = model;
		this.color = color;
		this.maxSpeed = 250;
	}

	// 생성자3. 모델, 색상, 최고속도
	Car(String model, String color, int maxSpeed) {
		this.company = "BENZ";
		this.model = model;
		this.color = color;
		this.maxSpeed = maxSpeed;
	}

	void carPrint() {
		System.out.println(company + ", " + model + ", " + color + ", " + maxSpeed);
	}

}
그렇지만, 이렇게 일일이 하드코딩하는 것은 매우 비효율적이다.
이럴때 사용하는 것이 this() 코드이다. this( )는 같은 클래스에서 생성자가 다른 생성자를 호출할 때 사용된다.
this() 코드를 이용하여 위의 코드를 개선하면,
public class Car {
	// 제조사, 모델, 색상, 최고속도
	String company;
	String model;
	String color;
	int maxSpeed;

	// Default 생성자
	Car() {
		this("아반떼", "blue", 200); // 같은 클래스 내의 다른 생성자 호출
		this.company = "현대자동차";
	}

	// 생성자1. 모델만 가져옴
	Car(String model) {
		this(model, "blue", 350);
		this.company = "기아자동차";
	}

	// 생성자2. 모델과 색상 가져옴
	Car(String model, String color) {
		this(model, color, 250);
		this.company = "BMW";
	}

	// 생성자3. 모델, 색상, 최고속도
	Car(String model, String color, int maxSpeed) {
		this.company = "BENZ";
		this.model = model;
		this.color = color;
		this.maxSpeed = maxSpeed;
	}

	void carPrint() {
		System.out.println(company + ", " + model + ", " + color + ", " + maxSpeed);
	}

}
▶ 가장 마지막에 있는 생성자3의 매개변수를 불러온다.
[this 와 this()]
1) this는 객체 자신을 가리키는 레퍼런스 변수로, 자신의 객체에 접근할 때 사용.
- 주로 멤버변수와 매개변수의 이름이 동일할 때, 이를 구분하기 위해 사용.
2) this( )는 같은 클래스에서 생성자가 다른 생성자를 호출할 때 사용.
- 주로 코드의 중복을 줄일 목적으로 사용.
- this( )는 생성자 코드에서만 사용 가능.
- this( )는 생성자 코드안에서 사용될 때 첫번째 문장으로 다른 코드보다 가장 윗줄에 위치해야 함.
public class CarTest {

	public static void main(String[] args) {
		Car myCar1 = new Car();
		myCar1.carPrint();

		Car myCar2 = new Car("쏘렌토");
		myCar2.carPrint();

		Car myCar3 = new Car("X5", "black");
		myCar3.carPrint();

		Car myCar4 = new Car("S클래스", "grey", 250);
		myCar4.carPrint();
	}
}
예제1
Q. 스마트폰을 클래스로 구현하기
1. Phone 클래스
2. 브랜드를 매개 변수로 받음
3. 전원상태는 on 또는 off 로 출력
먼저, Phone 생성
public class Phone {

	// 필드 선언
	String brand; // 브랜드
	int batteryLevel; // 배터리 잔량
	boolean isOn; // 전원 상태

	// 생성자 오버로딩: 입력 항목이 다른 생성자를 여러 개 생성하는 것
	// 디폴트 생성자: 매개변수 없는 생성자 (생성자 없을땐 JVM이 자동 생성, 있을 땐 자동 생성 X)
	Phone() {
	}

	// 생성자1
	Phone(String brand) {
		this.brand = brand;
	}

	// 생성자2
	Phone(String brand, int batteryLevel) {
		this.brand = brand;
		this.batteryLevel = batteryLevel;
	}

	// 생성자3
	Phone(String brand, int batteryLevel, boolean isOn) {
		this.brand = brand;
		this.batteryLevel = batteryLevel;
		this.isOn = isOn;
	}

	void phonePrint() {
		System.out.println("브랜드:" + brand + ", 배터리 잔량: " + batteryLevel + "%, 전원 상태: " + onOff());
	}

	String onOff() { // 전원 상태값 변환
		return (isOn) ? "on" : "off";
	}
}
[void 와 String-return]
1. void
- 정의: void는 메소드가 어떤 값을 반환하지 않음을 나타내는 반환 유형.
- 사용 예: 주로 특정 작업을 수행할 때 사용되며, 메소드 내에서 작업의 결과에 대한 반환이 필요하지 않은 경우에 적합. 예를 들어, 화면에 메시지를 출력하거나, 상태를 변경하는 등의 작업을 수행할 때 사용. ▶ 특정 작업을 수행하는 데 사용
2. String 반환
- 정의: String은 메소드가 문자열 데이터를 반환함을 나타내는 반환 유형.
- 사용 예: 메소드가 특정 데이터를 계산하거나 처리하여 그 결과를 문자열 형태로 전달할 필요가 있는 경우 사용. 예를 들어, 사용자 이름을 입력받아 환영 메시지를 생성하는 등의 작업에 적합. ▶ 데이터 처리 결과를 반환할 때 사용
다음으로, PhoneTest 생성
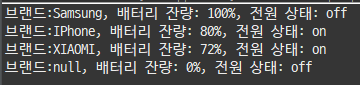
public class PhoneTest {

	public static void main(String[] args) {
		Phone myPhone = new Phone("Samsung");
		myPhone.batteryLevel = 100;
		myPhone.isOn = false;
		myPhone.phonePrint();

		Phone myPhone2 = new Phone("IPhone", 80);
		myPhone2.isOn = true;
		myPhone2.phonePrint();

		Phone myPhone3 = new Phone("XIAOMI", 72, true);
		myPhone3.phonePrint();

		Phone myPhone4 = new Phone(); // 디폴트 생성자
		myPhone4.phonePrint();

	}

}
예제2 (추가)
앞서 만든 Phone 클래스에 아래의 사항을 추가
1. 전원 켜기
- 전윈이 꺼져있고 배터리 잔량이 남아 있는 경우 켜기
- 전원이 켜지면 "(brand) 전원이 켜졌습니다." 출력
2. 베터리 사용
- 매개변수 int amount 가짐
- 전원이 켜져있고 배터리가 amount 이상인 경우 배터리 용량을 출력하기
- 배터리를 출력한 후 "(brand) 배터리가 00% 사용되었습니다. 남은 배터리: 00%" 출력
3. 전원 끄기
- 전원이 켜져 있으면 전원을 끄기
- 전원이 꺼지면 "(brand) 전원을 종료합니다." 출력
import java.util.Scanner;

public class Phone2 {
	Scanner scan = new Scanner(System.in);

	// 필드 선언
	String brand; // 브랜드
	int batteryLevel; // 배터리 잔량
	boolean isOn; // 전원 상태

	// 생성자
	Phone2(String brand, int batteryLevel, boolean isOn) {
		this.brand = brand;
		this.batteryLevel = batteryLevel;
		this.isOn = isOn;
	}

	void phonePrint() {
		System.out.println("브랜드:" + brand + ", 배터리 잔량: " + batteryLevel + "%, 전원 상태: " + onOff());
		System.out.println(phoneStat());
	}

	String onOff() { // 전원 상태값 변환
		return (isOn) ? "on" : "off";
	}

	String phoneStat() {
		return (isOn) ? brand + "전원이 켜져있습니다." : "전원이 꺼져있습니다.";
	}

	void turnOn() {
		if (!isOn) {
			isOn = true;
			System.out.println(brand + "전원을 켰습니다.");
		} else {
			System.out.println("전원이 이미 켜져있습니다.");
		}
	}

	void useBattery(int amount) {
		if ((isOn) & (batteryLevel >= amount)) {
//			System.out.println("현재 배터리 용량은 " + batteryLevel + "% 입니다.");
			System.out.println(brand + "배터리가 " + (100 - batteryLevel) + "% 사용되었습니다. 남은 배터리: " + batteryLevel + "%");
		}
	}

	void turnOff() {
		if (isOn) {
			System.out.println("전원을 정말 종료하시겠습니까? (y/n)");
			String confirm = scan.next();
			if (confirm.equals("y")) {
				isOn = false;
				System.out.println(brand + "전원을 종료합니다.");
			} else {
				System.out.println("전원을 종료하지 않습니다.");
			}
		} else {
			System.out.println("전원이 이미 꺼져있습니다.");
		}
//		scan.close();
	}

}
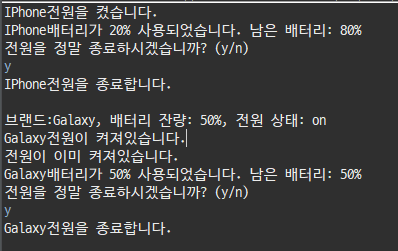
public class PhoneTest2 {

	public static void main(String[] args) {
		Phone2 myPhone = new Phone2("IPhone", 80, false);
		myPhone.phonePrint();
		myPhone.turnOn();
		myPhone.useBattery(20);
		myPhone.turnOff();

		System.out.println();

		Phone2 myPhone2 = new Phone2("Galaxy", 50, true);
		myPhone2.phonePrint();
		myPhone2.turnOn();
		myPhone2.useBattery(30);
		myPhone2.turnOff();

	}

}
예제3
Q. 영화 정보 출력하기
- 속성(필드)
- title: 영화 제목
- runtime: 상영 시간(분 단위)
- genre: 장르 (예: 액션, 코미디)
- 메서드
- 영화 정보 출력: printMovieInfo()
- 영화 상영 시간 확인: checkLength() ▶ 상영시간이 120분 이상이면 "~는 긴 영화입니다.", 120분 미만이면 "~는 짧거나 보통 길이의 영화입니다." 출력
public class MovieInfo {
	String title; // 영화 제목
	int runtime; // 상영 시간(분 단위)
	String genre; // 영화 장르

	MovieInfo(String title, int runtime, String genre) {
		this.title = title;
		this.runtime = runtime;
		this.genre = genre;
	}

	void printMoiveInfo() {
		System.out.println("영화: " + title + ", 상영 시간: " + runtime + "분, 장르: " + genre);
		System.out.println(checkLength(title, runtime));
	}

	String checkLength(String title, int runtime) {
		if (runtime >= 120) {
			return title + "은(는) 긴 영화 입니다.";
		} else {
			return title + "은(는) 짧거나 보통 길이의 영화입니다.";
		}
	}
}
▶ 영화 상영시간에 따라 긴 영화인지, 짧(거나 보통)은 영화인지를 출력해주는 checkLength() 메소드를 생성한 뒤,
printMovieInfo() 메서드 안에서 출력되도록 (인자로 title과 runtime을 받도록 함) 한다.
public class MoivePrint {

	public static void main(String[] args) {
		MovieInfo myMovie = new MovieInfo("어벤져스", 143, "액션");
		myMovie.printMoiveInfo();

		MovieInfo myMovie1 = new MovieInfo("맨인더다크", 99, "스릴러");
		myMovie1.printMoiveInfo();

	}

}
예제4
Q. 반려동물 관리
- 속성
- name: 반려동물 이름
- age: 나이
- type: 종류(강아지, 고양이)
- energy: 에너지 레벨 (0~100)
- 생성자
- 에너지를 제외한 모든 필드를 매개변수로 갖는 생성자
- 에너지는 100
- 메소드
- makeSound(): 반려동물이 소리를 냄
- eat(): 먹이를 먹으면 에너지 10% 증가
- play(): 활동하면 에너지 20% 감소
- printInfo(): 필드의 정보 출력
public class PetInfo {
	// 필드
	String name;
	int age;
	String type;
	int energy;

	// 생성자
	PetInfo(String name, int age, String type) {
		this.name = name;
		this.age = age;
		this.type = type;
		this.energy = 100;
	}

	// 메소드
	void printInfo() {
		System.out.println("이름: " + name + ", 나이: " + age + "세, 종류: " + type + ", 에너지: " + energy + "%");
	}

	void eat() {
		if (this.energy <= 91) {
			this.energy += 10;
			System.out.println(name + "(이)가 먹이를 먹었습니다! 에너지: " + this.energy + "%");
		} else {
			System.out.println(name + "는 배가 불러 못먹어요." + this.energy + "%");
		}
	}

	void play() {
		if (this.energy >= 21) {
			this.energy -= 20;
			System.out.println(name + "(이)가 신나게 놀았습니다! 에너지: " + this.energy + "%");
		} else if (this.energy < 19) {
			System.out.println(name + "(이)는 지금 너무 힘들어요. 남은 에너지: " + this.energy + "%");
		}
	}

	void makeSound() {
		if (this.type.equals("강아지")) {
			System.out.println(name + "(이)가 멍멍 짖습니다!");
		} else if (this.type.equals("고양이")) {
			System.out.println(name + "(이)가 야옹 웁니다!");
		} else {
			System.out.println("");
		}
	}

}
public class PetManage {
	public static void main(String[] args) {
		PetInfo myPet1 = new PetInfo("초코", 2, "강아지");
		myPet1.printInfo();
		myPet1.makeSound();
		myPet1.eat();
		myPet1.play();
		myPet1.play();
		myPet1.play();
		myPet1.play();
		myPet1.eat();
		myPet1.play();
		myPet1.play();

		System.out.println();

		PetInfo myPet2 = new PetInfo("노을이", 8, "고양이");
		myPet2.printInfo();
		myPet2.makeSound();
		myPet2.eat();
		myPet2.play();
	}
}
다음 내용
[java] 메소드 선언 : 가변 인수 모를 때 (feat. enhanced for문)
이전 내용 [java] java - 클래스, this() 코드이전 내용 [java] 예제 및 풀이 (Switch, 배열 + 반복문)이전 내용 [java] java 예제 및 풀이(scanner, 조건문, do-while)이전 내용 [java] parse+자료형: 문자열 변환이전
puppy-foot-it.tistory.com
'프로그래밍 및 기타 > Java, JSP, HTML, CSS' 카테고리의 다른 글
| [java] java 예제 (메소드 오버로딩) (0) | 2025.04.04 |
|---|---|
| [java] 메소드 선언 : 가변 인수 모를 때 (feat. enhanced for문) (0) | 2025.04.03 |
| [java] 예제 및 풀이 (Switch, 배열 + 반복문) (0) | 2025.04.02 |
| [java] java 예제 및 풀이(scanner, 조건문, do-while) (0) | 2025.04.01 |
| [java] parse+자료형: 문자열 변환 (0) | 2025.04.01 |


