이전 내용
[Android] 위젯 - 이미지뷰(Image View)
이전 내용 [Android] 계산기 만들기이전 내용 [Android] 회원정보 출력 기능 만들기이전 내용 [Android] 난수 생성기 만들기이전 내용 [Android] 안드로이드 위젯(widget)이전 내용 [Android] Android Studio 다운 받
puppy-foot-it.tistory.com
레이아웃
레이아웃(Layout) : 안드로이드 앱에서 화면에 보이는 요소(Button, TextView 등등)를 뷰(View)라고 하고, 여러 뷰들을 포함하고 배치하는 역할을 하는 것. 레이아웃은 위젯의 위치를 정렬하거나 연관된 위젯들을 그룹화하는 역할을 한다.
즉, 앱 화면에 위젯을 어떻게 배치할지를 결정한다.
[안드로이드에서 제공하는 5가지 대표적인 레이아웃]
- 제약 레이아웃(ConstraintLayout) : 제약 조건을 사용하여 화면을 구성. 안드로이드 스튜디오에서 자동으로 설정하는 디폴트 레이아웃
- 선형 레이아웃(LinearLayout) : 한 쪽 방향으로 차례대로 뷰를 추가하여 화면 구성
- 상대 레이아웃(RelativeLayout) : 부모 컨테이너나 다른 뷰와의 상대적 위치로 화면 구성
- 테이블 레이아웃(TableLayout) : 격자 모양의 배열을 사용하여 화면을 구성하는 방법
- 프레임 레이아웃(FrameLayout) : 가장 상위에 있는 하나의 뷰 또는 뷰그룹만 보여주는 방법. 여러개의 뷰를 중첩한 후 각 뷰를 전환하여 보여주는 방식으로 자주 사용.
layout_weight (가중치)
layout_weight를 통해서 원하는 비율로 화면을 조정할 수 있다.
<EditText
    android:layout_width="match_parent"
    android:layout_height="wrap_content"
    android:hint="To"
    android:layout_weight="0" />

<EditText
    android:layout_width="match_parent"
    android:layout_height="wrap_content"
    android:hint="Subject"
    android:layout_weight="0" />

<EditText
    android:layout_width="match_parent"
    android:layout_height="0dp"
    android:hint="Message"
    android:layout_weight="1"
    android:gravity="top"/>

<Button
    android:layout_width="wrap_content"
    android:layout_height="wrap_content"
    android:text="Send"
    android:layout_gravity="right"
    android:layout_weight="0" />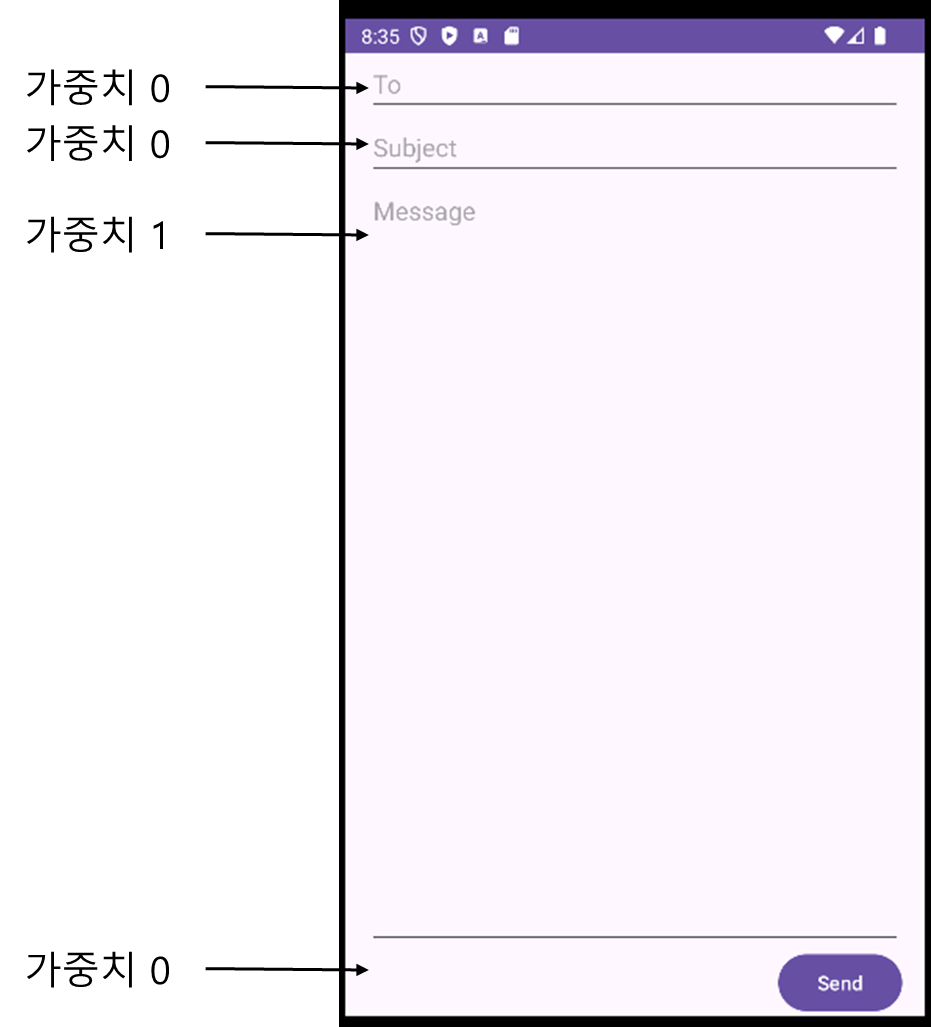
테이블 레이아웃
테이블 레이아웃은 격자 모양의 배열로 화면을 구성하는 표 모양의 레이아웃이다.
테이블 레이아웃을 추가하게 되면, TableRow 태그가 자동으로 추가되어 있는데, TableRow안에 여러개의 뷰를 추가할 수 있다. TableLayout에 TableRow의 개수가 행의 개수가 되고, 각 TableRow에 들어있는 뷰의 개수가 열의 개수가 된다.
<TableLayout xmlns:android="http://schemas.android.com/apk/res/android"
    android:layout_width="match_parent"
    android:layout_height="match_parent"
    android:layout_gravity="center">

        <TableRow
            android:layout_width="match_parent"
            android:layout_height="wrap_content" >
            <TextView android:text="주소" />
            <EditText android:text="서울시 종로구 120" />
        </TableRow>

        <TableRow
            android:layout_width="match_parent"
            android:layout_height="wrap_content" >
            <TextView android:text="이름" />
            <EditText android:text="홍길동" />
        </TableRow>

        <TableRow
            android:layout_width="match_parent"
            android:layout_height="wrap_content" >
            <Button android:text="저장" />
            <Button android:text="취소" />
        </TableRow>

</TableLayout>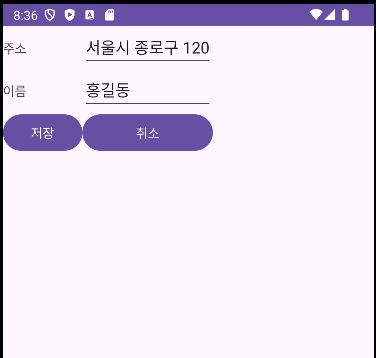
상대 레이아웃 (Relative Layout)
상대 레이아웃은 위젯을 다른 위젯이나 부모 레이아웃을 기준으로 상대적으로 정렬하는 레이아웃이다. (제약 레이아웃이 등장하면서 레거 상태로 남게 되어 추후 없어질 수 있음.)
<RelativeLayout xmlns:android="http://schemas.android.com/apk/res/android"
    android:layout_width="match_parent"
    android:layout_height="match_parent">

    <TextView
        android:id="@+id/address"
        android:layout_width="match_parent"
        android:layout_height="wrap_content"
        android:layout_alignParentTop="true"
        android:text="주소를 입력하세요" />

    <EditText
        android:id="@+id/input"
        android:layout_width="match_parent"
        android:layout_height="wrap_content"
        android:background="@android:drawable/editbox_background"
        android:layout_below="@id/address" />

    <Button
        android:id="@+id/cancel"
        android:layout_width="wrap_content"
        android:layout_height="wrap_content"
        android:layout_below="@id/input"
        android:layout_alignParentRight="true"
        android:layout_marginLeft="10dp"
        android:text="취소" />

    <Button
        android:layout_width="wrap_content"
        android:layout_height="wrap_content"
        android:layout_toLeftOf="@id/cancel"
        android:layout_alignTop="@id/cancel"
        android:text="확인" />


</RelativeLayout>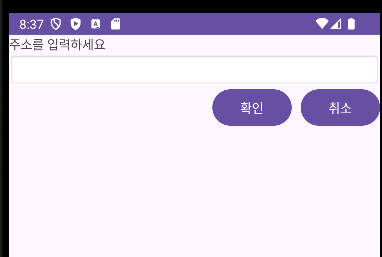
그리드 레이아웃
안드로이드의 그리드 레이아웃(GridLayout)은 UI 구성 요소를 격자 형태로 배치할 수 있는 레이아웃으로, 이 레이아웃은 가로 및 세로 방향으로 여러 개의 셀을 만들 수 있도록 하여, 화면을 효율적으로 재구성할 수 있다.
<GridLayout xmlns:android="http://schemas.android.com/apk/res/android"
    android:layout_width="match_parent"
    android:layout_height="match_parent"
    android:columnCount="3"
    android:rowCount="3"
    xmlns:tools="http://schemas.android.com/tools"
    tools:context=".MainActivity">

    <Button
        android:text="Button 1" />

    <Button
        android:layout_columnSpan="2"
        android:text="Button 2 (Column Span 2)" />

    <Button
        android:layout_rowSpan="2"
        android:layout_gravity="fill_vertical"
        android:text="Button 3" />

    <Button
        android:text="Button 4" />

    <Button
        android:text="Button 5" />

    <Button
        android:text="Button 6" />

    <Button
        android:text="Button 7" />

    <Button
        android:text="Button 8" />


</GridLayout>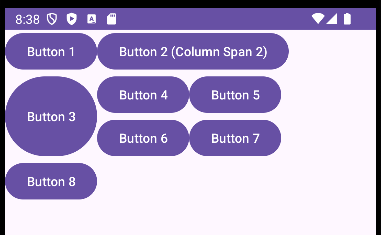
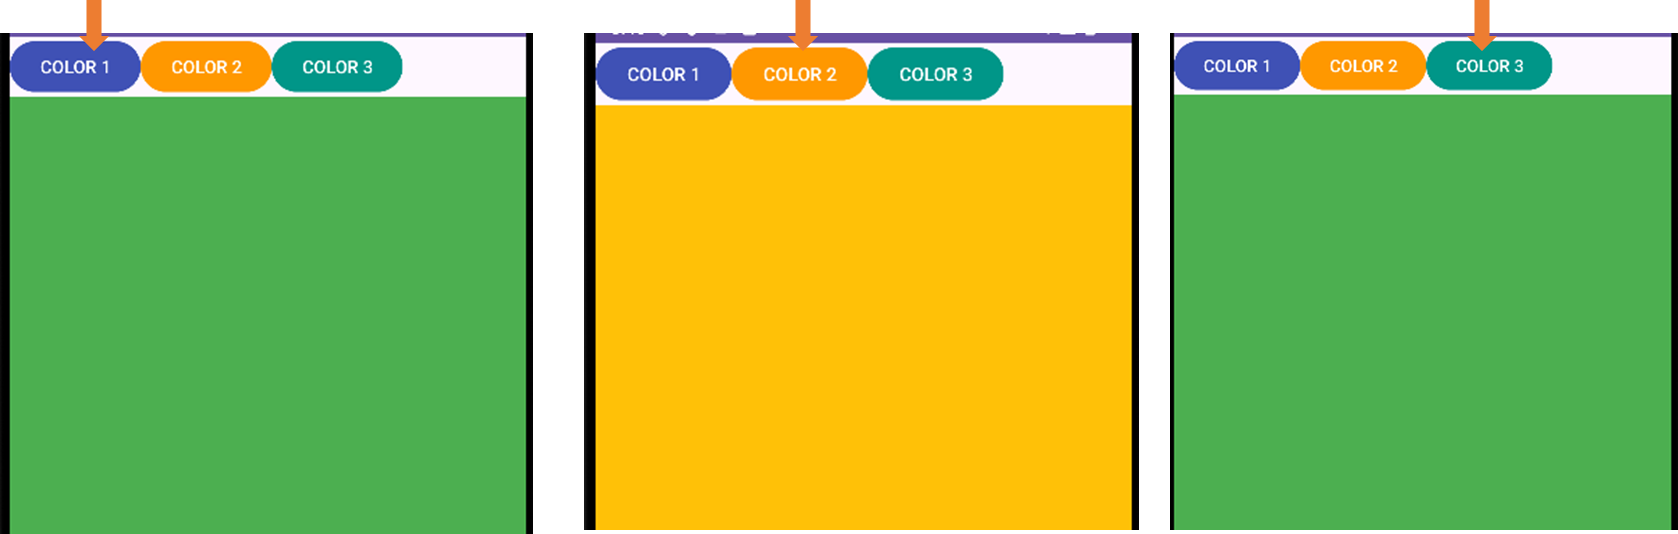
프레임 레이아웃
프레임 레이아웃은 가장 상위의 뷰 또는 뷰 그룹 하나만 보여주는 것으로 여러가지를 중첩한 뒤에 각 뷰를 전환하면서 보여주는 방식이다.
<?xml version="1.0" encoding="utf-8"?>
<LinearLayout xmlns:android="http://schemas.android.com/apk/res/android"
    android:layout_width="match_parent"
    android:layout_height="match_parent"
    android:orientation="vertical">

    <LinearLayout
        android:layout_width="match_parent"
        android:layout_height="wrap_content"
        android:orientation="horizontal">

        <Button
            android:id="@+id/button1"
            android:layout_width="wrap_content"
            android:layout_height="wrap_content"
            android:backgroundTint="#3F51B5"
            android:onClick="onClick"
            android:text="COLOR 1" />

        <Button
            android:id="@+id/button2"
            android:layout_width="wrap_content"
            android:layout_height="wrap_content"
            android:backgroundTint="#FF9800"
            android:onClick="onClick"
            android:text="COLOR 2" />

        <Button
            android:id="@+id/button3"
            android:layout_width="wrap_content"
            android:layout_height="wrap_content"
            android:backgroundTint="#009688"
            android:onClick="onClick"
            android:text="COLOR 3" />

    </LinearLayout>

    <FrameLayout
        android:layout_width="match_parent"
        android:layout_height="match_parent">

        <TextView
            android:id="@+id/view1"
            android:layout_width="match_parent"
            android:layout_height="match_parent"
            android:background="#3F51B5"></TextView>

        <TextView
            android:id="@+id/view2"
            android:layout_width="match_parent"
            android:layout_height="match_parent"
            android:background="#FFC107"></TextView>

        <TextView
            android:id="@+id/view3"
            android:layout_width="match_parent"
            android:layout_height="match_parent"
            android:background="#4CAF50"></TextView>
    </FrameLayout>

</LinearLayout>
LinearLayout: 세 개의 버튼을 수평으로 배치하는 컨테이너
- android:layout_width="match_parent": 부모의 너비에 맞춤.
- android:layout_height="wrap_content": 자식 요소의 크기에 맞춰 높이 결정.
- android:orientation="horizontal": 자식 요소들이 수평으로 나열.
세 개의 버튼 (Button): 클릭 시 onClick 메서드 호출. 각 버튼의 배경 색상과 텍스트는
BUTTON 1: 파란색 (#3F51B5), BUTTON 2: 주황색 (#FF9800),BUTTON 3: 청록색 (#009688)
FrameLayout: 버튼에 따라 보일 텍스트 뷰 포함
- android:layout_width="match_parent": 부모의 너비에 맞춤.
- android:layout_height="match_parent": 부모의 높이에 맞춤.
세 개의 TextView: 각기 다른 배경색이 설정되어 있다. 이곳은 사용자가 버튼을 클릭할 때 보여지는 텍스트 뷰다.
VIEW 1: 파란색 배경 (#3F51B5), VIEW 2: 노란색 배경 (#FFC107), VIEW 3: 초록색 배경 (#4CAF50)
import android.os.Bundle;
import android.view.View;
import android.widget.TextView;

import androidx.appcompat.app.AppCompatActivity;


public class MainActivity extends AppCompatActivity {

    private TextView view1, view2, view3;

    @Override
    protected void onCreate(Bundle savedInstanceState) {
        super.onCreate(savedInstanceState);
        setContentView(R.layout.activity_main);

        view1 = (TextView) findViewById(R.id.view1);
        view2 = (TextView) findViewById(R.id.view2);
        view3 = (TextView) findViewById(R.id.view3);
        }

    public void onClick(View view) {
        view1.setVisibility(View.INVISIBLE);
        view2.setVisibility(View.INVISIBLE);
        view3.setVisibility(View.INVISIBLE);

        int id = view.getId();
        if (id == R.id.button1) {
            view1.setVisibility(View.VISIBLE);
        } else if (id == R.id.button2) {
            view2.setVisibility(View.VISIBLE);
        } else if (id == R.id.button3) {
            view3.setVisibility(View.VISIBLE);
        }
    }
}- onCreate() 메서드: 액티비티가 생성될 때 호출되며, 레이아웃을 설정하고 각 텍스트 뷰를 초기화한다. UI 요소인 텍스트 뷰를 XML에서 찾아 변수를 설정하여 후속 코드에서 이를 사용할 수 있도록 한다.
- onClick(View view) 메서드: 각 버튼 클릭 시 호출되며 다음과 같은 동작을 수행한다.
모든 텍스트 뷰를 INVISIBLE 상태로 숨긴 뒤 클릭된 버튼의 ID를 확인하여, 해당 버튼이 클릭되었을 경우 그에 맞는 텍스트 뷰를 VISIBLE로 변경하여 표시한다.
[참고]
안드로이드 프로그래밍 with 자바
다음 내용
[Android] 레이아웃 - 2 : 제약 레이아웃, 레이아웃 편집기
이전 내용 [Android] 레이아웃 - 1이전 내용 [Android] 위젯 - 이미지뷰(Image View)이전 내용 [Android] 계산기 만들기이전 내용 [Android] 회원정보 출력 기능 만들기이전 내용 [Android] 난수 생성기 만들기이전
puppy-foot-it.tistory.com
'Java > Java Android' 카테고리의 다른 글
| [Android] 텍스트뷰 동적 생성 (0) | 2025.04.29 |
|---|---|
| [Android] 레이아웃 - 2 : 제약 레이아웃, 레이아웃 편집기 (0) | 2025.04.29 |
| [Android] 위젯 - 이미지뷰(Image View) (0) | 2025.04.29 |
| [Android] 계산기 만들기 (0) | 2025.04.28 |
| [Android] 회원정보 출력 기능 만들기 (1) | 2025.04.28 |


